Showing posts with label cute. Show all posts

Friday, August 31, 2012

Button Earrings Now Available on Etsy


These cuties are now available for sale on my Etsy shop! Adding a whimsical element to any outfit, these earrings are the perfect addition to your jewelery collection! Stop buy and shop today, you might be surprised by what you can discover!


Wednesday, August 8, 2012

DIY Maxi Skirt


With fall coming, back-to-school sales are continuously calling my name. However, my current budget doesn't allow for my dream shopping spree. Ho hum. I stopped at Goodwill today to hopefully fix my shopping itch.


I found this cute dress, by Forever 21, for $4.99. However, in all honesty my boobs won't fit into the top of the dress. I walked around the store three times and couldn't get the fabulous tribal print out of my mind, so I decided to transform it into a maxi skirt.


I cut the top of the dress off, attempting to cut evenly along the pattern.


To make the dress into a skirt I attached it to elastic (not stretched). I measured my waist and added 2 inches. The extra inches allow for seam allowance and makes the skirt easier to get on and off.  Fold the elastic in half and sew allowing a 1/2 inch allowance.


Fold the extra tabs of the elastic back and sew flat.


After looking for my straight pins for 10 minutes, I then folded the fabric over the elastic loop and pinned in place.


I sewed the elastic along the bottom edge of it, grabbing the fabric along the way. Loraine (my sewing machine) and I got into a fight half way through the skirt, where I had to rip the seam and start over, but it was worth it!


Cute and comfy skirt!!

Cost: $7.00 (dress and elastic) Time: 15 minutes

Sunday, June 10, 2012

Slumber Party Cupcakes


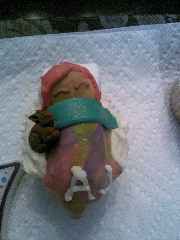
I have been obsessed with making fun cupcakes for all occasions ever since "Hello, Cupcake!" hit the shelves in 2008. The girl I nanny hosted a slumber party last night to celebrate her 7th birthday, and these individualized cupcakes were a hit!
Using regular cake mix, I baked 6 vanilla cupcakes in white liners for the slumber party cupcakes. In lieu of using oil, I use applesauce in all my baking because, one, I am allergic to canola oil, and two, fruit in a cupcake won't hurt anyone!
While the cupcakes baked, I began working on the decorations. Since the party had a hippie theme to it, the child asked if I could make the "sleeping bags" tie-dye. In order to do so, I melted four Laffy Taffys (one of each color) together for 15 seconds. This allowed the colors to not only be mixed, but also, the Laffy Taffy is easier to work with once softened. Once softened, I rolled out the Laffy Taffys onto parchment paper. To keep the Laffy Taffys from sticking to the rolling pin, I oiled it up!
2012-06-08 12.08.15.jpg
 2012-06-08 12.18.45.jpg2012-06-08 12.47.03.jpg


Once The Laffy Taffy was rolled to a thickness, that I was pleased with, using a pizza cutter, I cut the Laffy Taffy into squares for the blankets of the cupcakes. For the trim of the cupcakes, I used bright colored Airheads to off-set the wildness of the "tie-dye". I attached the trim to the blanket using frosting.

https://mail-attachment.googleusercontent.com/attachment/?ui=2&ik=72c79d0266&view=att&th=137d20c28b80863a&attid=0.8&disp=inline&realattid=1404314353898881024-8&safe=1&zw&saduie=AG9B_P--kPQ817VlzoLImzsDgqQu&sadet=1339367284274&sads=0Bcden1Bf6h2z3bM-O9oS3gpg3U&sadssc=1To assemble the "bodies" of the cupcakes you will need one marshmallow (cut-lengthwise), a mini vanilla wafer, and 2 jelly beans for each. Once the cupcakes, have cooled, frost them with vanilla icing. The icing will serve as the glue to hold the bodies to the cupcakes. One half of the marshmallow will serve as the pillow, while the other will be the body. Two jelly beans are the feet, and the mini vanilla wafer is the head. I used 6 mini vanilla wafers as placements for the heads, so I had an idea of where to put the decorated ones. Place blankets over the bodies and continue with decorating the faces.

I decorated each cupcakes, to look like each girl attending and for that I needed 3 different hair colors: red, blonde, and brunette. I placed a small amount of vanilla frosting into three seal-able plastic snack bags. Adding food coloring to each bag allowed my to make the different shades I wanted. I was careful to cut a small hole in a corner of each bag to allow for easy piping of colors.I decorated each sleeping face and the beginning of the hair on a flat surface before placing into the cupcake for finishing touches. For the lips, I used a touch of red frosting with the help of a toothpick. Once all was assembled and decorated I attached a teddy graham or snack cookie bunny onto the cupcakes with a bit of frosting.